Particle Projects
April 2020
Particle Particle Webhook to ThingSpeak
ThingSpeak
The ThingSpeak IoT Platform allows you to aggregate, visualize, and analyze live data streams in the cloud. Data can be sent to ThingSpeak using both REST and MQTT APIs. Data analysis and visualization is performed using MATLAB apps. A ThingSpeak Alerts API allows you to send email alerts. The free account permits publishing up to four channels at a message rate of up to every 15 seconds (or longer).
Particle docs for configuring a ThingSpeak webhook
ThingSpeak API reference (REST & MQTT API)
Multiple Value Webhook
This tutorial will show you how to push up to seven values from your Particle device to one ThingSpeak channel as a single data package with the same date/time stamp. This is accomplished by packaging all of the values into a JSON string.
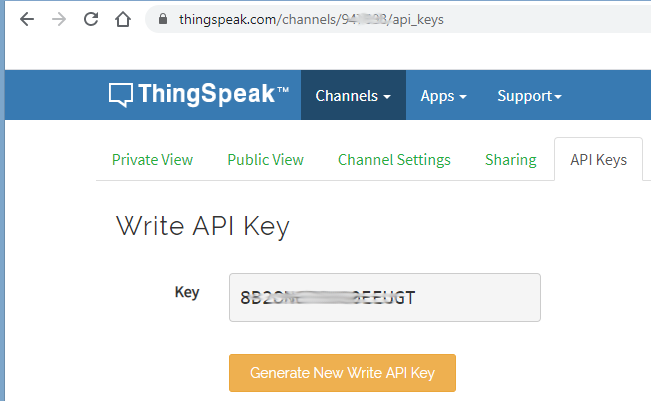
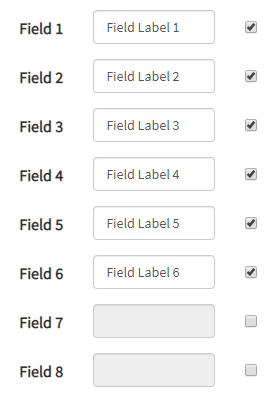
Create a new or login to a ThingSpeak account and then create a new channel and get the Write API Key. The data from the Particle Cloud Webhook will go to each of the ThingSpeak fields named field1 to field6. Enable each of the fields 1 through 6 by clicking the checkbox. The number of fields enabled must match the fields published by the Particle code and the associated Webhook, otherwise ThingSpeak will respond to the Webhook with an error. All of the other fields in the form (other than "field#") are optional and for the most part are metadata. The ThingsSpeak API will associate the data pushed to it from the Particle Cloud Webhook to the channel through the Write API Key. Click the green Save Channel button at the bottom of the page to save the ThingSpeak channel.
General information about creating a Webhook can be found on my Particle software details page. Make sure you limit the Particle.publish() rate to greater than every 15 seconds if you are using the free ThingSpeak account. The code below will build a JSON string with six fields, each corresponding to the analog inputs A0 to A5. Note that the JsonParserGeneratorRK library is used, and this sample code is a complete example on how to build a JSON string using that library.
#include "Particle.h"
#if (PLATFORM_ID == PLATFORM_XENON)
SYSTEM_MODE(MANUAL);
SYSTEM_THREAD(ENABLED);
#endif

// Install library: JsonParserGeneratorRK
// Reference: https://github.com/rickkas7/JsonParserGeneratorRK
#include "JsonParserGeneratorRK.h"

// Timer for publishing analog input values to the Particle Cloud
const unsigned long TIMER_PUBLISH_INTERVAL_MS = 30000; // Min is 1000 ms
unsigned long timerPublishLast = 0;

unsigned long pubCount = 0;
unsigned long publish_error_count = 0;

// Bundle all of the analog input data into a structure.
const byte AI_COUNT = 6;
struct analog_inputs_t {
  byte pin;
  String pinName;
  unsigned int ADC;
  unsigned int ADC_offset;
  unsigned long ai_samples;
  double fs_val;
  String fs_unit;
  double mV_to_fs;
} arr_ai[AI_COUNT];

void setup() {
  Mesh.off(); // Turn the Mesh Radio off

  pinMode(D7, OUTPUT);

  Serial.begin();
  waitFor(Serial.isConnected, 30000);
  Serial.printlnf("System version: %s", (const char*)System.version());

  // Initialize arr_ai
  arr_ai[0].pin = A0;
  arr_ai[0].pinName = "A0";
  arr_ai[1].pin = A1;
  arr_ai[1].pinName = "A1";
  arr_ai[2].pin = A2;
  arr_ai[2].pinName = "A2";
  arr_ai[3].pin = A3;
  arr_ai[3].pinName = "A3";
  arr_ai[4].pin = A4;
  arr_ai[4].pinName = "A4";
  arr_ai[5].pin = A5;
  arr_ai[5].pinName = "A5";
  for (int i=0; i<AI_COUNT; i++) {
    pinMode(arr_ai[i].pin, INPUT);
    arr_ai[i].ADC = 0;
    arr_ai[i].fs_val = 0.0;
    // Move anything below to before for () in order to assign unique values to each analog input.
    arr_ai[i].ADC_offset = 1;               // Calibration correction
    arr_ai[i].mV_to_fs = 0.001;             // Conversion factor to apply to mV analog input reading to full scale
    arr_ai[i].fs_unit = "V";                // Unit for the analog input values in full scale
  }

} // setup()


void loop() {

  ReadAnalogInputs();
  PublishAiVals();

} // loop()


void ReadAnalogInputs() {
  // 12 bit ADC (values between 0 and 4095 or 2^12) or a resolution of 0.8 mV
  // Hardware minimum sample time to read one analog value is 10 microseconds.
  // Raw ADC values are adjusted by a calibration factor arr_ai_ADC_calib[n].ADCoffset
  // that is determined by bench testing against precision voltage reference.
  // Update .ADC with the cumulative ADC value (to calculate average over the publish interval).
  // Update .fs_val with the current ADC value and check for alarm conditions.
  for (int i=0; i<AI_COUNT; i++) {
    int ADC = analogRead(arr_ai[i].pin) + arr_ai[i].ADC_offset;
    arr_ai[i].ADC += ADC;
    arr_ai[i].fs_val = double(ADC) * 3300.0 / 4096.0 * arr_ai[i].mV_to_fs;
    arr_ai[i].ai_samples++;
  } // for
}  // ReadAnalogInputs()


void PublishAiVals() {
  if (timerPublishLast > millis())  timerPublishLast = millis();
  if ((millis() - timerPublishLast) > TIMER_PUBLISH_INTERVAL_MS) {

    if (pubCount %2)
      digitalWrite(D7, HIGH);
    else
      digitalWrite(D7, LOW);

    // This creates a buffer to hold up to 256 bytes of JSON data (good for Particle.publish)
    JsonWriterStatic<256> jw;
    jw.setFloatPlaces(3);

    for (int i=0; i<AI_COUNT; i++) {
      double fs_val = double(arr_ai[i].ADC) / double(arr_ai[i].ai_samples) * 3300.0 / 4096.0 * arr_ai[i].mV_to_fs;
      //jw.insertKeyValue(arr_ai[i].pinName, fs_val);
      jw.insertKeyValue("field" + String(i+1), fs_val);
      arr_ai[i].ADC = 0;
      arr_ai[i].ai_samples = 0;
    } // for

    Serial.printlnf("jw.getBuffer() = '%s'", jw.getBuffer());
    // jw.getBuffer() = '"field1":0.054,"field2":1.609,"field3":2.000,"field4":0.001,"field5":0.001,"field6":0.001'

    byte PubResult = Particle.publish("thingspeak_ai", jw.getBuffer(), PRIVATE);
    if (PubResult == 1)
      publish_error_count = 0;
    else
      publish_error_count++;


    pubCount++;
    timerPublishLast = millis();
  } // timer
} // PublishAiVals()
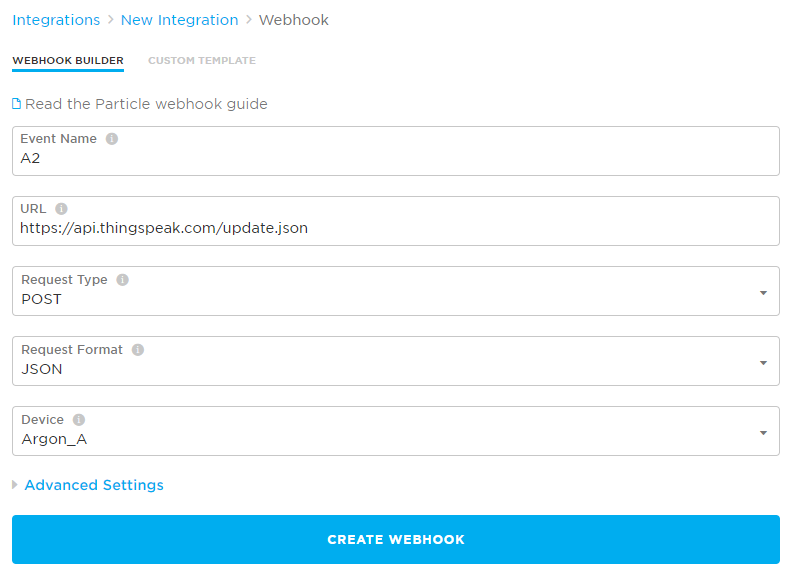
From the Particle Console, create a new Particle Webhook using the settings as shown below. Note that the Event Name entered must match the string in the Device code for the publish() function.
URL: https://api.thingspeak.com/update.json
Click on the Advanced Settings link at the bottom of the page. Click on the Custom radio button under the 'JSON DATA' section. In a text editor (NOT on the form under 'Custom'), prepare the JSON data as shown below, updating the api_key with your ThingSpeak Write API Key)
{
"api_key": "your-thingspeak-write-api-key",
"created_at": "{{{PARTICLE_PUBLISHED_AT}}}",
{{{PARTICLE_EVENT_VALUE}}},
"status": "{{{PARTICLE_EVENT_NAME}}}"
}
Editing the JSON outside of the Particle form field is recommended because the form has a bug that makes it very hard to edit anything under the 'Custom' option. I tried reporting this to Particle, but could not get them to try it themselves and experience the error.
The device code will publish the string below to the Particle Cloud and the Webhook will access that string via the variable PARTICLE_EVENT_VALUE and update the JSON string that is pushed to ThinkSpeak.
"field1":0.054,"field2":1.609,"field3":2.000,"field4":0.001,"field5":0.001,"field6":0.001
Copy the JSON data from your text editor, and then in the Particle integration form, highlight the sample Custom JSON data and paste the clipboard contents, overwriting the existing JSON. Click the large SAVE button at the bottom of the page to save your Webhook.
Below is the actual JSON string sent by the Webhook to ThingSpeak.
{
"api_key": "your-thingspeak-write-api-key",
"created_at": "2020-05-19T10:02:27Z",
"field1": 0.054,
"field2": 1.609,
"field3": 2.000,
"field4": 0.001,
"field5": 0.001,
"field6": 0.001,
"status": "thingspeak_ai"
}
Wait 30 seconds or more for the Particle device to publish a value, and then refresh the page and scroll to the bottom of the Webhook page to see the LOGS. If everything was configured properly, you will see a small green circle with a check inside of it. Click on the log to see more details about the POST to ThingSpeak.
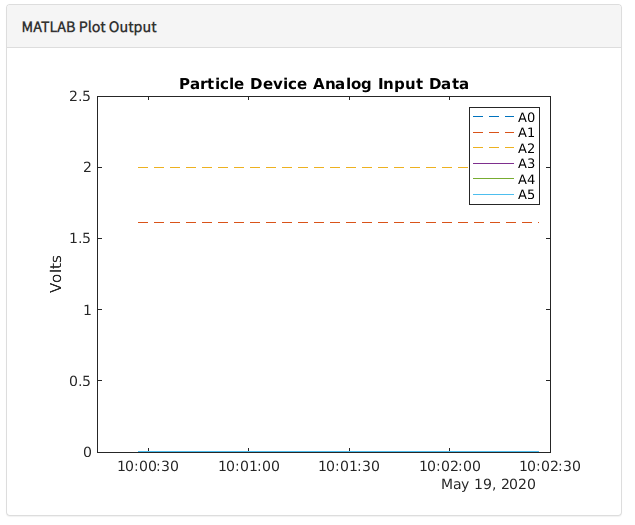
Go to ThingSpeak and click on either the Private View or the Public View tab. Click on the MATLAB Visualization button. Under Templates choose the Custom (no starter code) option, and then click the Create button. Edit the Name to something relevent such as "Line plot of Particle device ai channel data" and then in the MATLAB Code form field, enter the code listed below. Update the chnId and apiReadKey with your Channel Id and Read API Key values (look to the right of the page).
% Create a line chart of the data for all six fields
chnId = %#######;  % Your Channel ID
apiReadKey = 'your-thingspeak-api-read-key';
[data, chnX] = thingSpeakRead(chnId, 'Fields',[1 2,3,4,5,6], ...
                                   'NumPoints', 5, ...
                                   'ReadKey', apiReadKey);
chnA0Y = data(:, 1);
chnA1Y = data(:, 2);
chnA2Y = data(:, 3);
chnA3Y = data(:, 4);
chnA4Y = data(:, 5);
chnA5Y = data(:, 6);

% Visualize Data
plot(chnX,chnA1Y,'--',chnX,chnA1Y,'--',chnX,chnA2Y,'--',chnX,chnA3Y,chnX,chnA4Y,chnX,chnA5Y);
title('Particle Device Analog Input Data');
ylabel('Volts');
legend('A0','A1','A2','A3','A4','A5')
Click the Save and Run button, scroll down the page, and you should see a line chart similar to what is shown below.
At the top of the ThingSpeak web page, click on Channels, select My Channels, click on the channel you created, click on the Private View or Publlic View tab you chose previously. You should see the line chart you just created on that page.
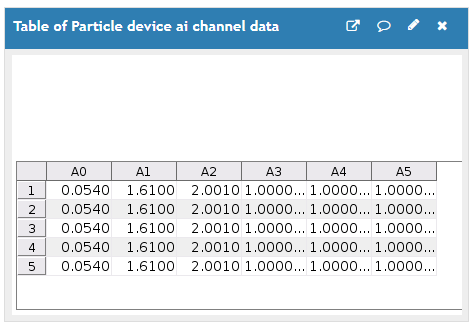
Click on the MATLAB Visualization button. Under Templates choose the Custom (no starter code) option, and then click the Create button. Edit the Name to something relevent such as "Table of Particle device ai channel data" and then in the MATLAB Code form field, enter the code listed below. Update the chnId and apiReadKey with your Channel Id and Read API Key values (look to the right of the page).
chnId = %#######;  % Your Channel ID
apiReadKey = 'your-thingspeak-api-read-key';
[data, chnX] = thingSpeakRead(chnId, 'Fields',[1, 2, 3, 4, 5, 6], ...
                                   'NumPoints', 5, ...
                                   'ReadKey', apiReadKey);
% Visualize data with a uitable
f = figure();
uit = uitable(f);
uit.Data = data;
uit.ColumnName = {'A0','A1','A2','A3','A4','A5'};
uit.Position = [5 5 450 150]; %[left bottom width height]
uit.ColumnWidth = {65,65,65,65,65,65};
Click the Save and Run button, scroll down the page, and you should see a line chart similar to what is shown below.
At the top of the ThingSpeak web page, click on Channels, select My Channels, click on the channel you created, click on the Private View or Publlic View tab you chose previously. You should see the line chart you just created on that page.
Single Channel Webhook
Create a new or login to a ThingSpeak account and then create a new channel and get the Write API Key. The data from the Particle Cloud Webhook will go to Field 1. Assign a label to Field 1 that describes it (Ex. "voltage") so that it appears labeled properly in the ThingSpeak chart. All of the other fields are optional, but do not enable them (checkbox) unless you are sending data to them, otherwise ThingSpeak will return an error when the Webhook executes. The ThingsSpeak API will associate the data pushed to it from the Particle Cloud Webhook to the channel through the Write API Key.
General information about creating a Webhook can be found on my Particle software details page. Make sure you limit the Particle.publish() rate to greater than every 15 seconds if you are using the free ThingSpeak account. The Particle.publish() on the Particle device should look something like this:
unsigned int A0ADC = analogRead(A0);
// Argon, Boron, Xenon have 12-bit ADC.  2^12 = 4096
double A0mV = double(A0ADC) * 3300.0 / 4096.0;
iResult = Particle.publish("A0", String::format("%.2f",A0mV), PRIVATE);
From the Particle Console, create a new Particle Webhook using the settings as shown below.
URL: https://api.thingspeak.com/update.json
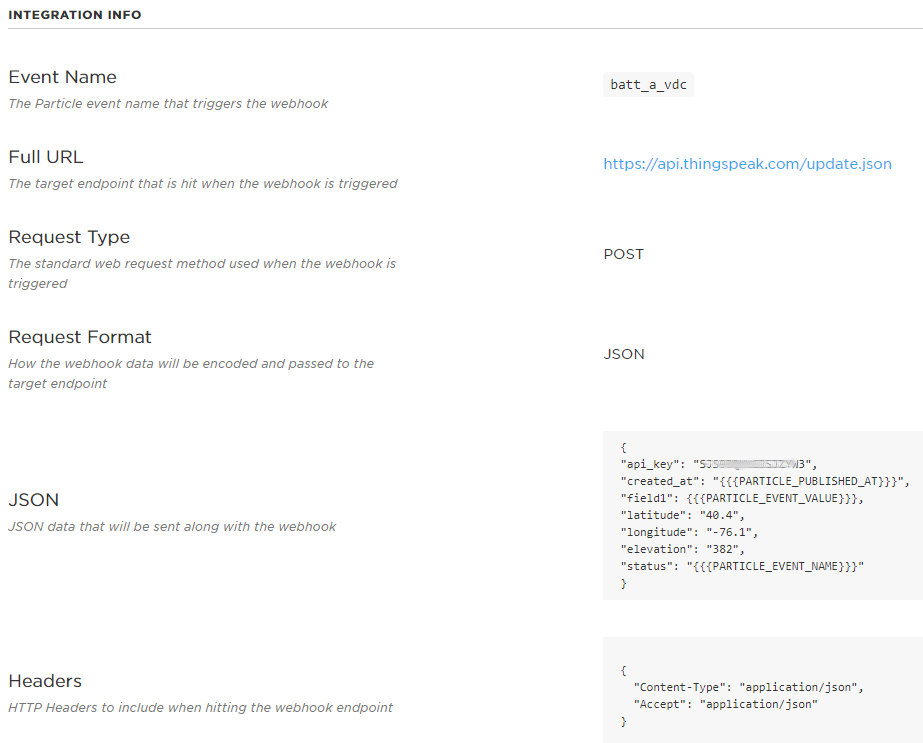
Click on the Advanced Settings link at the bottom of the page. Click on the Custom radio button under the 'JSON DATA' section. In a text editor (NOT on the form under 'Custom'), prepare the JSON data as shown below, updating the api_key with your ThingSpeak Write API Key) and latitude, longitude and elevation with the Particle device location:
{
"api_key": "XXXXXXXXXXXXXXXX",
"created_at": "{{{PARTICLE_PUBLISHED_AT}}}",
"field1": {{{PARTICLE_EVENT_VALUE}}},
"latitude": "40.4",
"longitude": "-76.1",
"elevation": "382",
"status": "{{{PARTICLE_EVENT_NAME}}}"
}
You may omit the latitude, longitude, elevation, and status fields and use only the JSON shown below.
{
"api_key": "XXXXXXXXXXXXXXXX",
"created_at": "{{{PARTICLE_PUBLISHED_AT}}}",
"field1": {{{PARTICLE_EVENT_VALUE}}},
"status": "{{{PARTICLE_EVENT_NAME}}}"
}
Copy the JSON data from your text editor, and then in the Particle integration form, highlight the sample Custom JSON data and paste the clipboard contents, overwriting the existing JSON.
Editing the JSON outside of the Particle form field is recommended because the form has a bug that makes it very hard to edit anything under the 'Custom' option. I tried reporting this to Particle, but could not get them to try it themselves and experience the error.
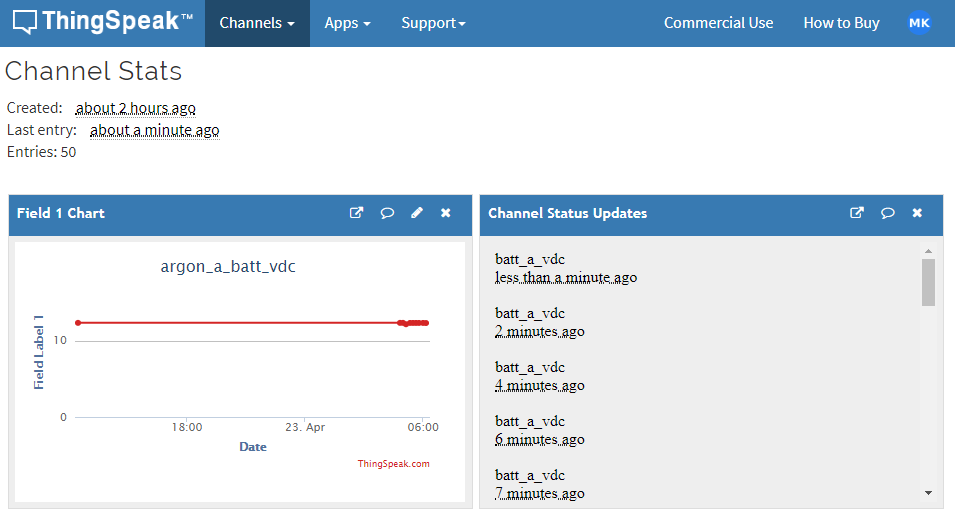
Once you have the Particle Webhook setup and data is being published by your device, visit your ThingSpeak page and refresh the Channel Stats page.
Using this method over the 'form' method proposed in the Particle docs gives you the ability to add the date/time stamp and to include location metadata in your feed to ThingSpeak.
More ThingSpeak Webhook Links
How to set up a JSON for multiple variables in a webhook integration
Using ThingSpeak and a Particle Photon
ThingSpeak + Particle Photon using Webhooks by Hans Scharler, Robert Mawrey
Bulk-Update a ThingSpeak Channel Using a Particle Photon Board by ThingSpeak / Mathworks
Particle Tutorials for ThingSpeak
Do you need help developing or customizing a IoT product for your needs? Send me an email requesting a free one hour phone / web share consultation.
The information presented on this website is for the author's use only. Use of this information by anyone other than the author is offered as guidelines and non-professional advice only. No liability is assumed by the author or this web site.

.jpg)

 (4).png)


.png)




.jpg)
.png)
.png)